Maybe you’re avoiding shopping this holiday season. Or maybe you’re looking for ways to occupy your kids’ time while they’re stuck at home on the weekends. Crafting and creating your own holiday gifts takes care of both problems.
From sewing and baking to making paper crafts, there are lots of great gifts that your kids of all ages will be proud to put their name on, especially after they made each item themselves.
Homemade Soap
Though all our soap bars look a bit different, we stuck with the same recipe to make it easy for busy families: Clove + mandarins + essential oils + soap. Our super creative mom on the go, Lauren Jeziorski, photographer and graphic designer, used a goat milk soap base and a clear Glycerin soap base to add variety.
The result: An easy gift win! By experimenting with colors, fragrances and packaging, beautifully handcrafted soap bars really do delight the senses while reminding us all that the true spirit of the holiday season lies in the joy of giving.
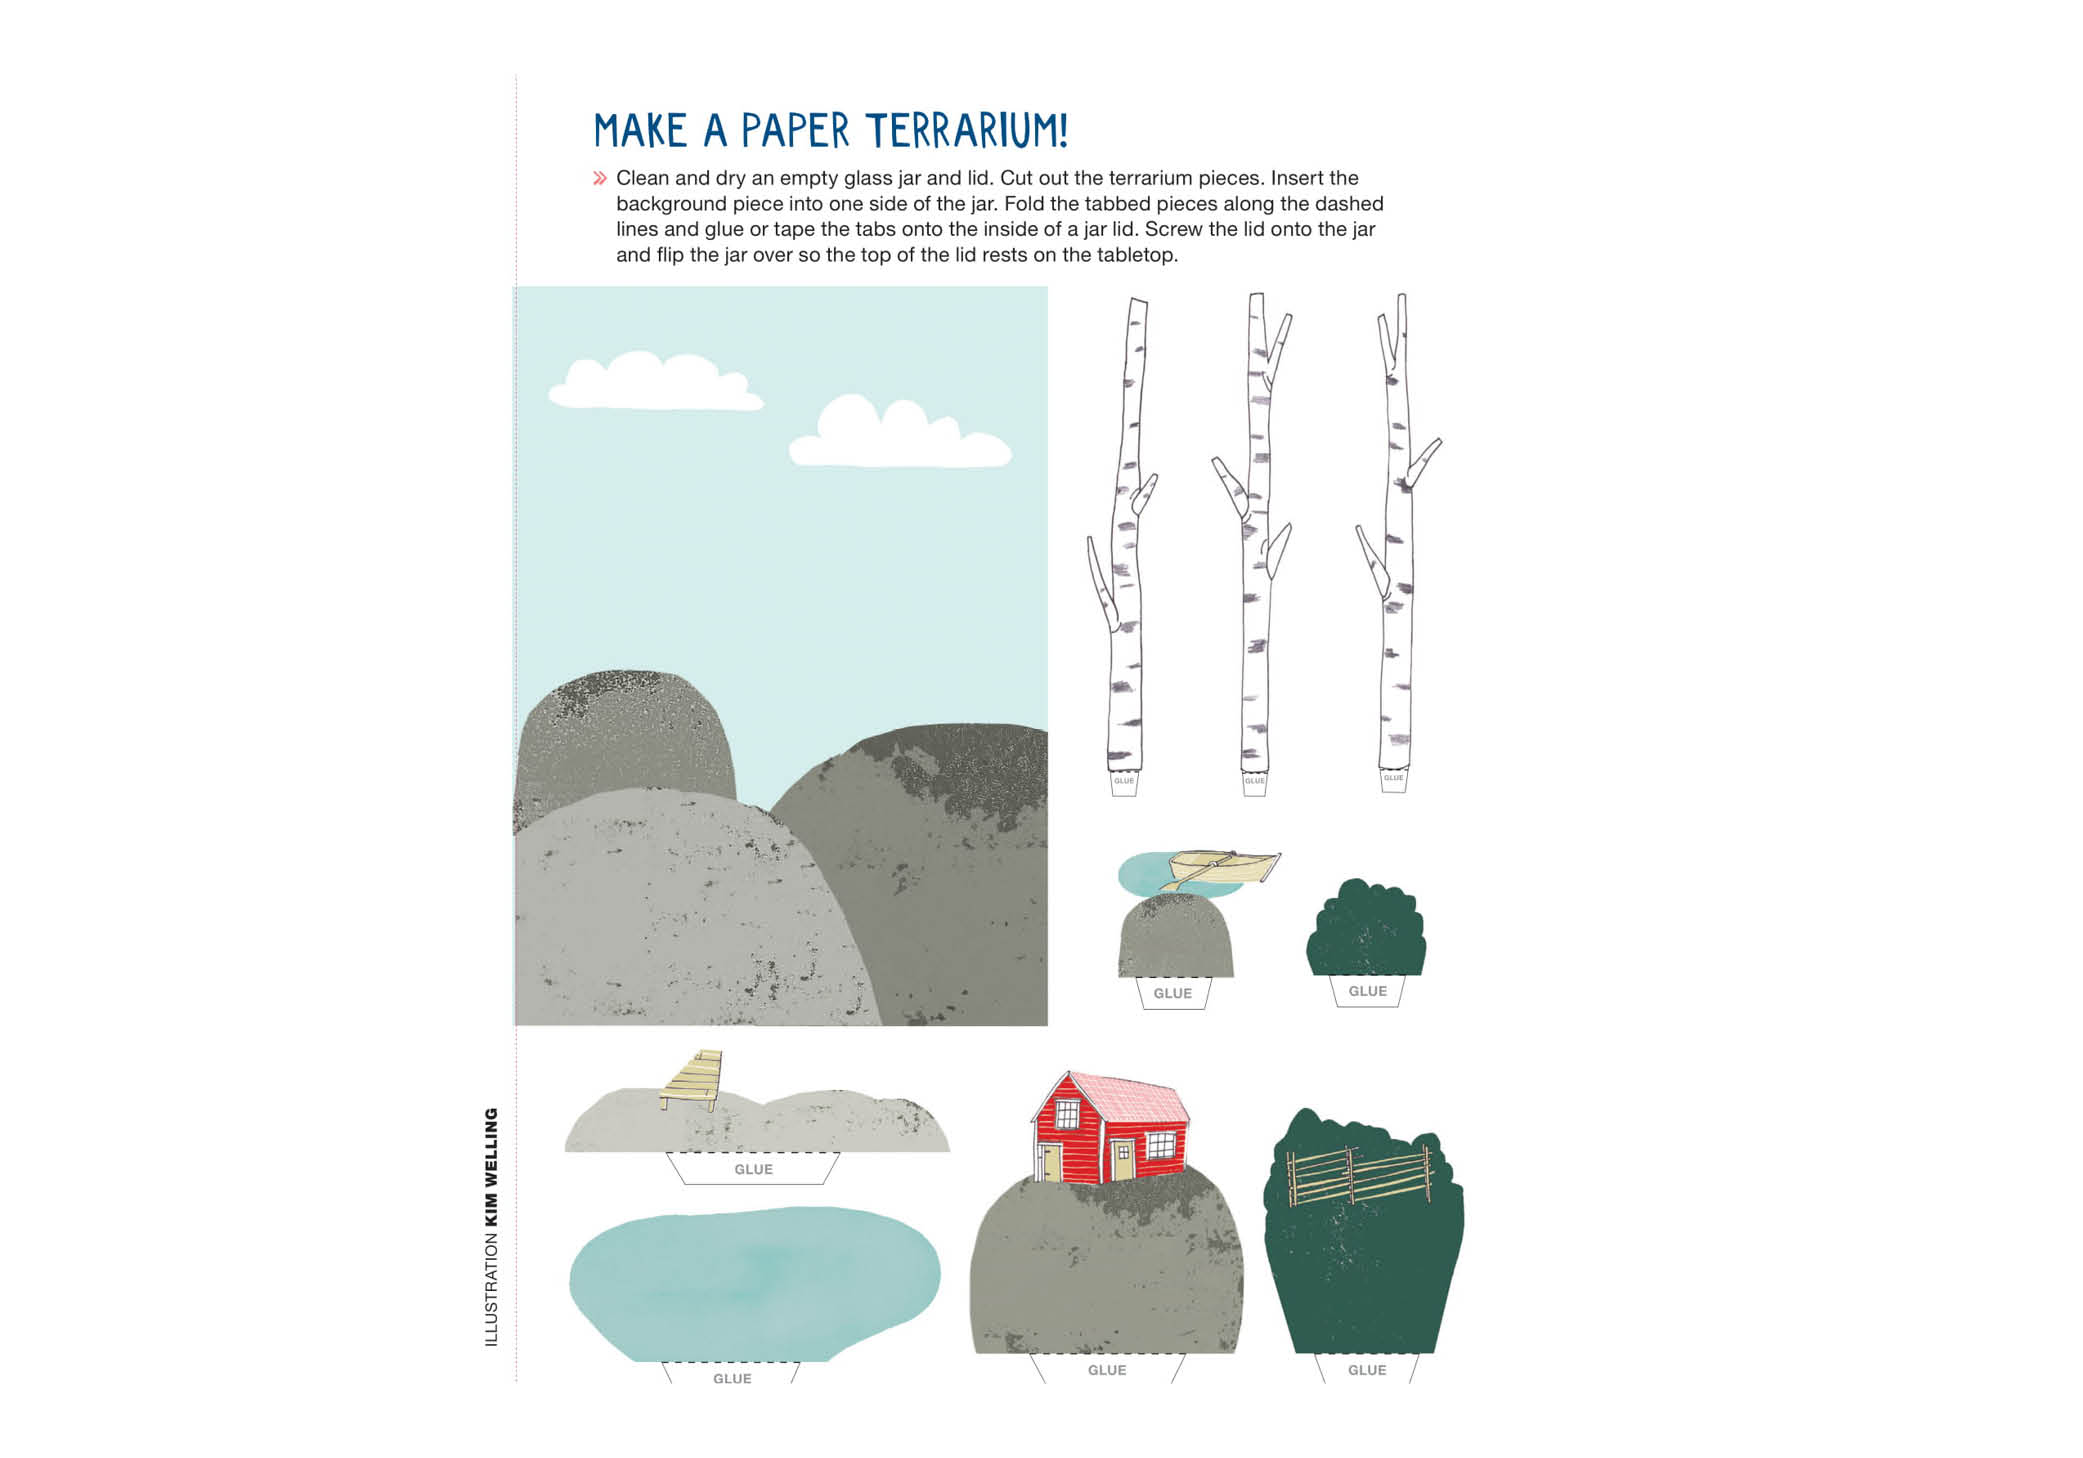
Paper Terrarium
- Best for ages: 7-14
The Kids’ Book of Paper Love: Write. Craft. Play. Share., by Irene Smit and Astrid van der Hulst is a beautiful book of paper crafts is a jewel of DIY gifts. Kids can write a story for grandparents, draw a picture for aunts and uncles, make a paper box or use the stiff, jeweled, glossy or even blue, shiny paper to develop their own creations. Then, there are directions to turn the paper provided into envelopes to send as gifts.
Materials
- Scissors
- Clean, dry empty glass jar & lid
- Glue or tape
Directions
- Cut out the pictures on the page.
- Insert the background piece to one side of the jar, picture-side in.
- Fold the tabbed pieces along the dashed lines and glue or tape the tabs onto the inside of the jar lid.
- Screw the lid onto the jar and flip the jar over so the top of the lid rests on the tabletop.
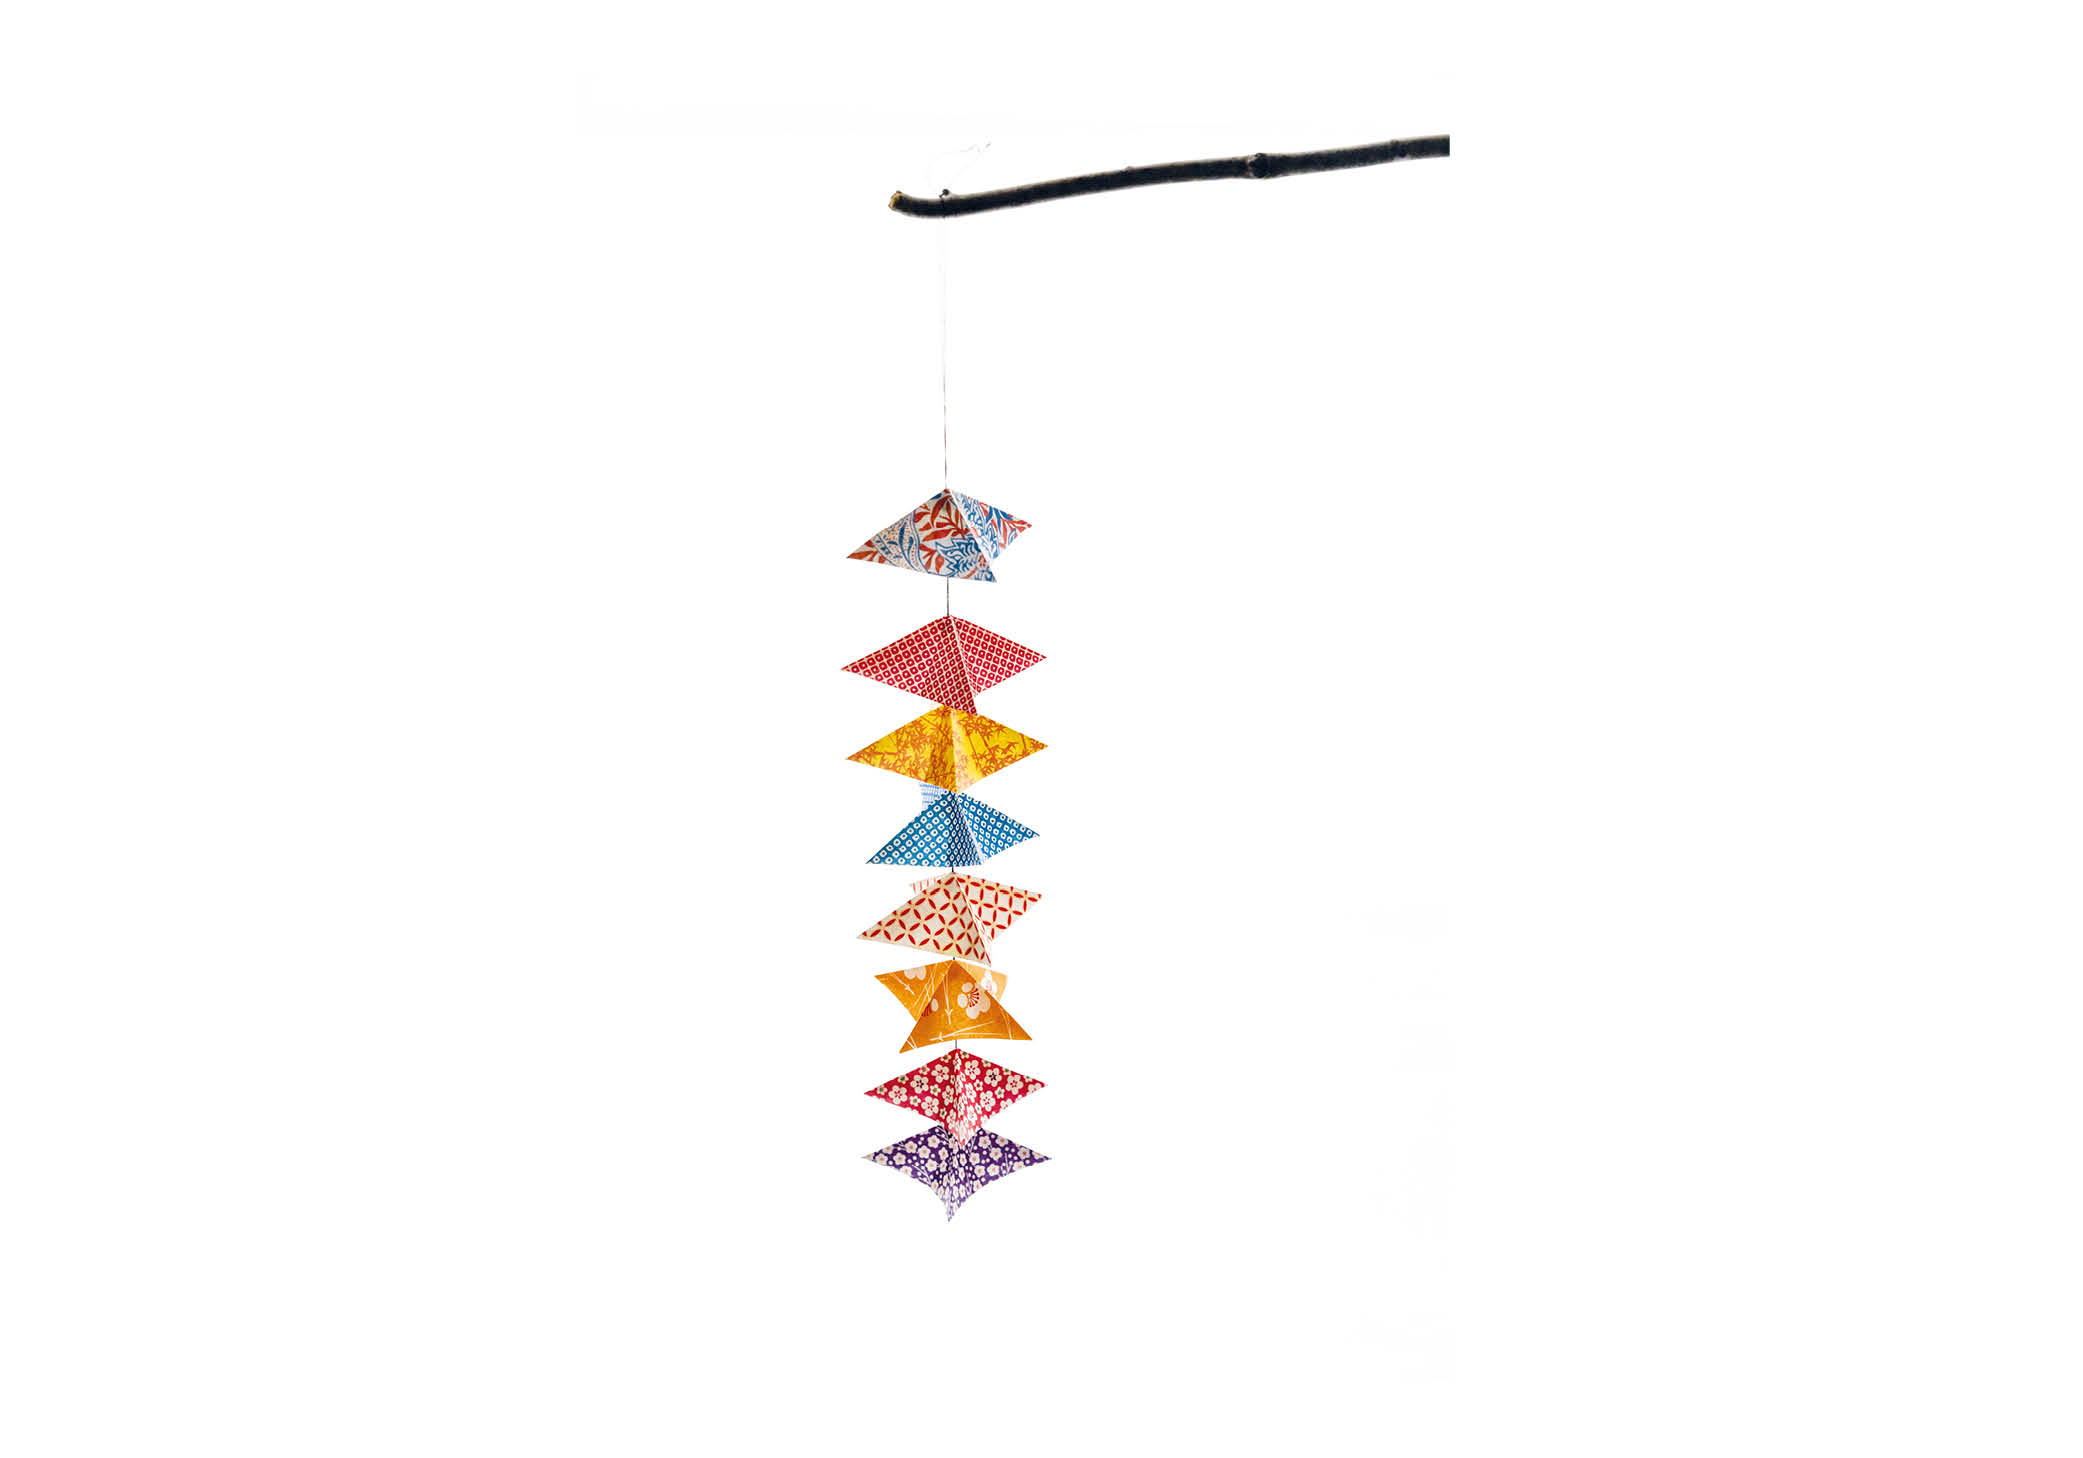
Star Streamer
Best for ages: 6-12
In Art Sparks, by Marion Abrams & Hilary Emerson Lay, the authors use nature as a catalyst, as kids are shown open-ended creative art to make as beautiful as they see fit. Using paints, pencil, paper, fabric, nature and even decoupage, kids can create all kinds of gifts for family and friends.
Learning to make stars out of origami paper, kids are encouraged to turn the stars into garland, in the “Star Streamer” project. Find paper that is festive to your favorite holiday colors to create a variation that will work with your recipient’s decor!
Materials
- At least 7 sheets of 3-inch x 3-inch origami paper
- Needle
- 1 yard of sewing thread
- At least 7 beads
- 1-foot long stick
Directions
- Fold one square of the paper in half with the patterned side facing in. Unfold the paper, then fold it in half in the other direction, again with the patterned side facing in.
- Open the paper and turn it so that the blank side is facing up. Fold your paper in half diagonally. Unfold it, then fold it in half diagonally again in the other direction.
- Lay the paper down with the patterned side facing up. Pinch two corners and gently push them together to make a star shape. Repeat steps 1-3 with the rest of your papers so that you have a pile of stars.
Hang the stars
- Thread and knot the needle, then run it through one of the beads. Bring the needle around and back through the beads one more time to secure it in place with the thread.
- Starting from the blank side of the paper, run the needle and thread through the center of one of the stars, and slide the star down the thread until it rests on the bead. Repeat steps 1-2 with the rest of your beads and stars, leaving about two inches between each bead.
- Tie the star streamer to your stick.
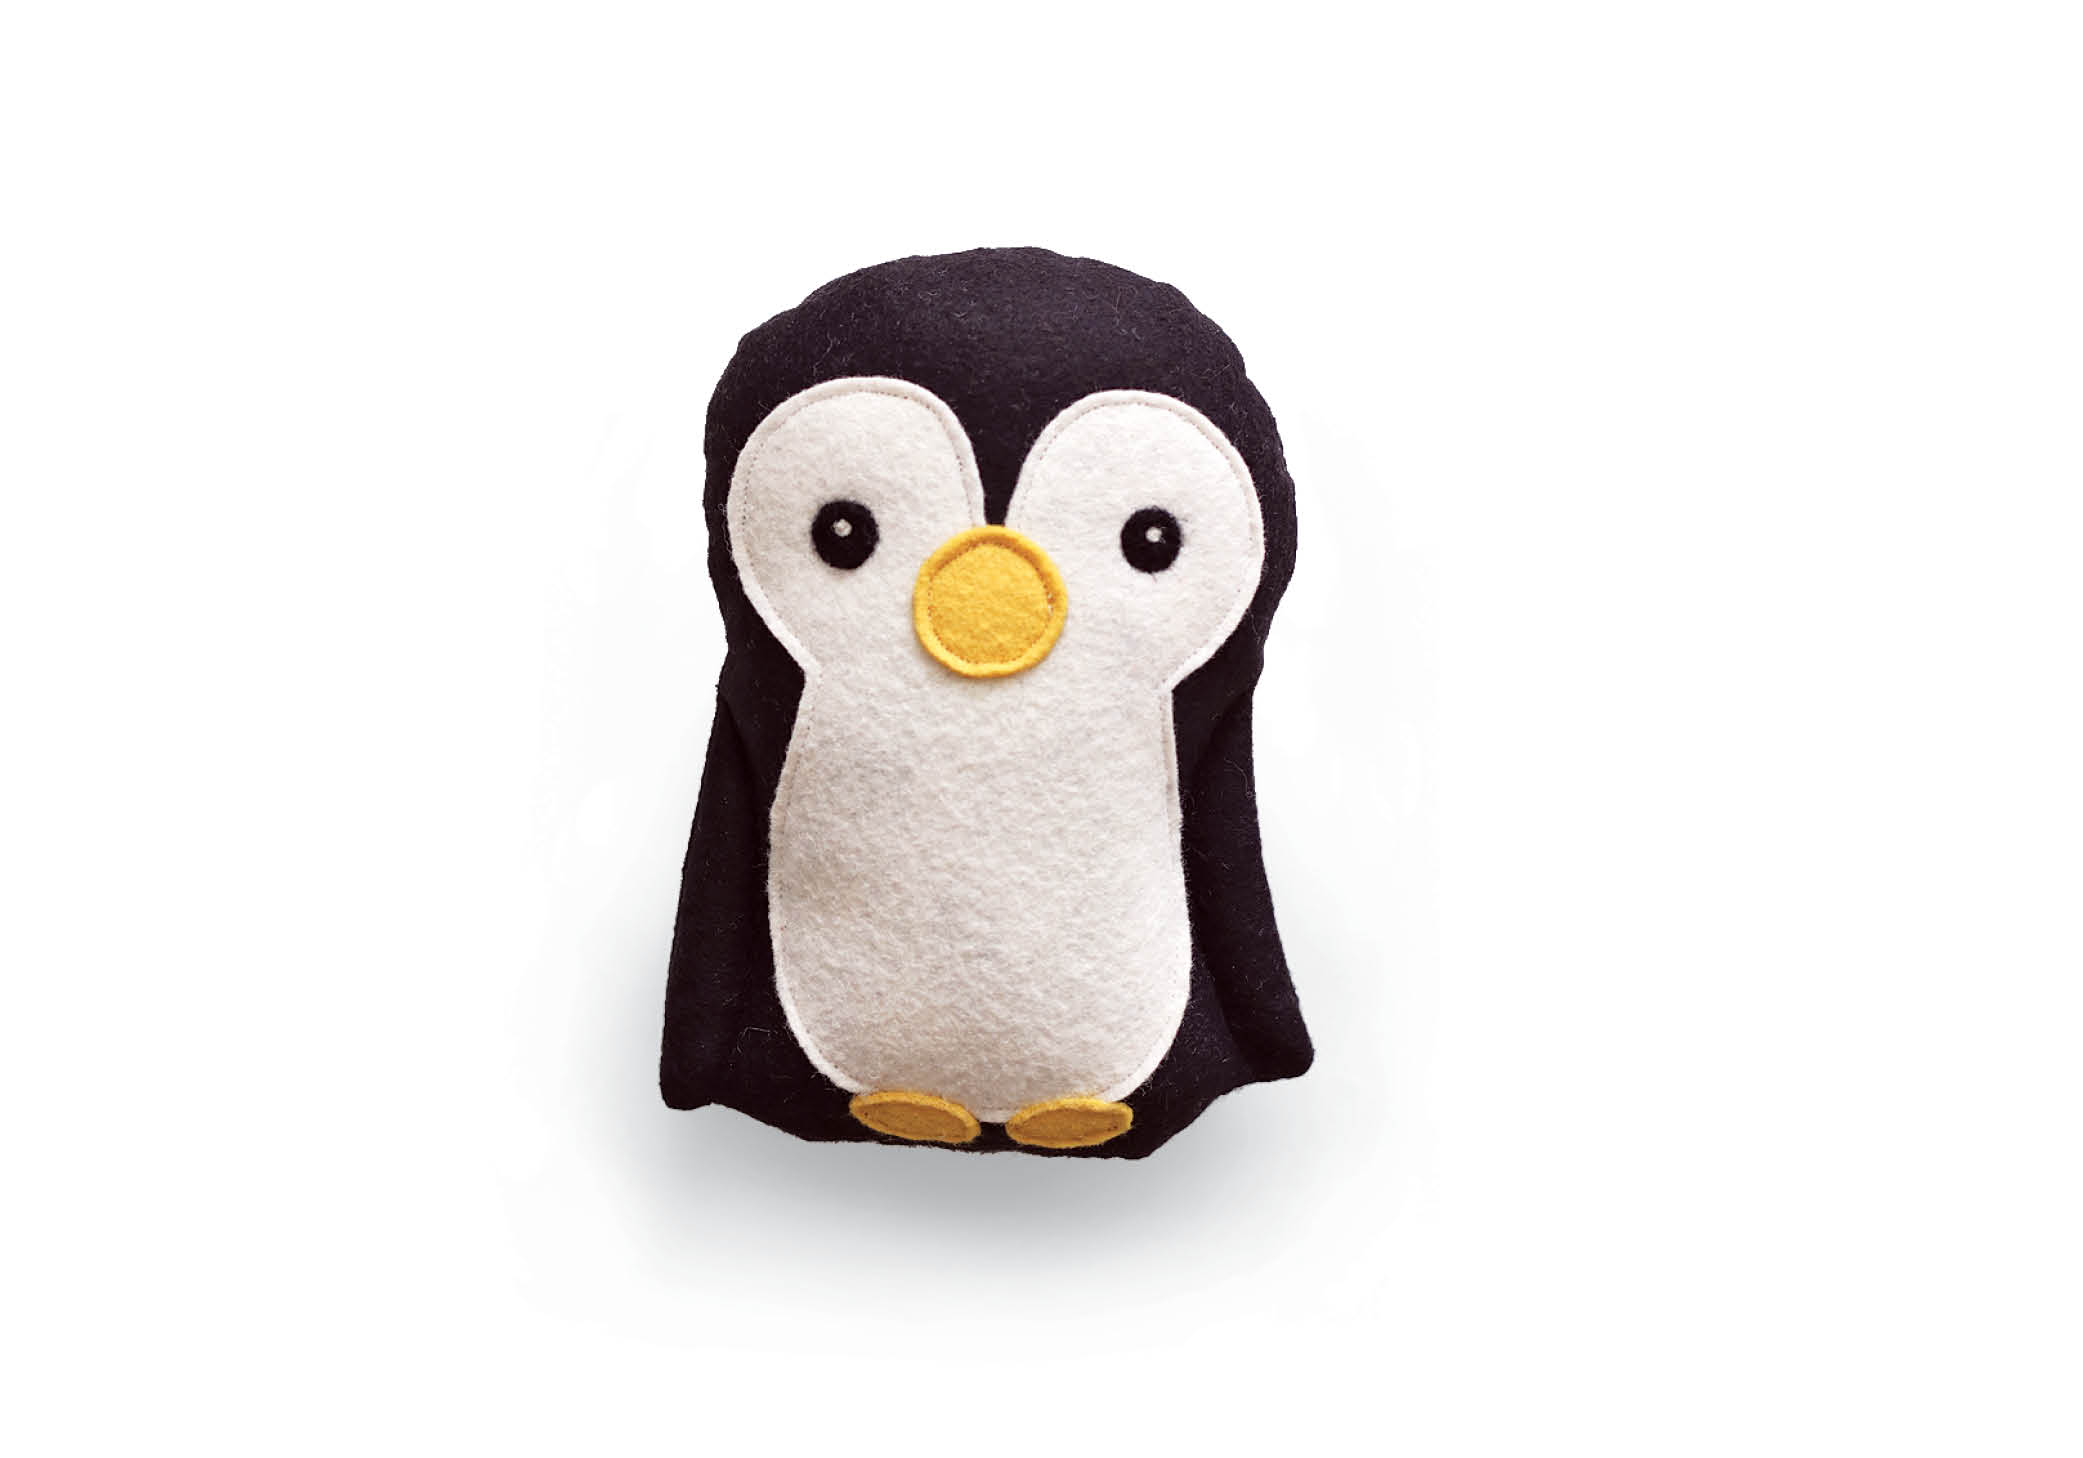
Patrick Penguin
Best for ages: 10-18
Kids who are ready to take the next step in their crafting career — and who have been introduced to a sewing machine ‚ can easily make one of the adorable dolls in Handmade Animal Dolls by Melissa Lowry. With 20 patterns from a parrot to a unicorn in overalls, makers of all skills will enjoy giving these adorable friends.
Materials
- Basic Sewing Kit
- 11.75-inch x 7.75-inch black wool-blend felt for the body
- 5-inch x 5.75-inch white wool-blend felt for the belly
- 1.5-inch x 3-inch yellow wool-blend felt for the feet and beak
- 8.5-inch x 2.5-inch knit fabric or an old sweater to repurpose as a scarf
- Matching thread
- Polyester filling
- Black wool roving
- Approx. 1 1/2-inch ball of yellow wool roving (if felting the beak)
- Needle-felting needle
- Templates from Handmade Animal Dolls
Directions
- Trace all the templates onto freezer paper. Cut them out. The pattern is designed to work with a 1/8-inch seam allowance. If you’d prefer to work with a 1/4-inch seam, add to the pattern as necessary.
- Transfer the templates onto your felt using a water-soluble pencil.
- Cut and iron all the pieces.
- Layer the belly piece (B) on top of one of the body pieces (A) and topstitch it using white thread.
- Pin or fuse the feet (C) and beak (D) pieces onto the belly piece. If you choose to needle felt the beak, only fuse the feet.
- Topstitch them in place.
- With right sides together and using black thread, sew the two body pieces together leaving a turning gap at the bottom of approximately 2 1/2 inches wide.
- Trim any excess fabric near the fins.
- Turn the penguin right-side out.
- Referring to the template, trace the fin lines using a water-soluble pencil.
- Lightly stuff the sides where the fins are.
- Topstitch with black thread following the fin markings you drew.
- Stuff the rest of the penguin to a medium firmness.
- Finish your penguin by closing the bottom gap with a ladder stitch.
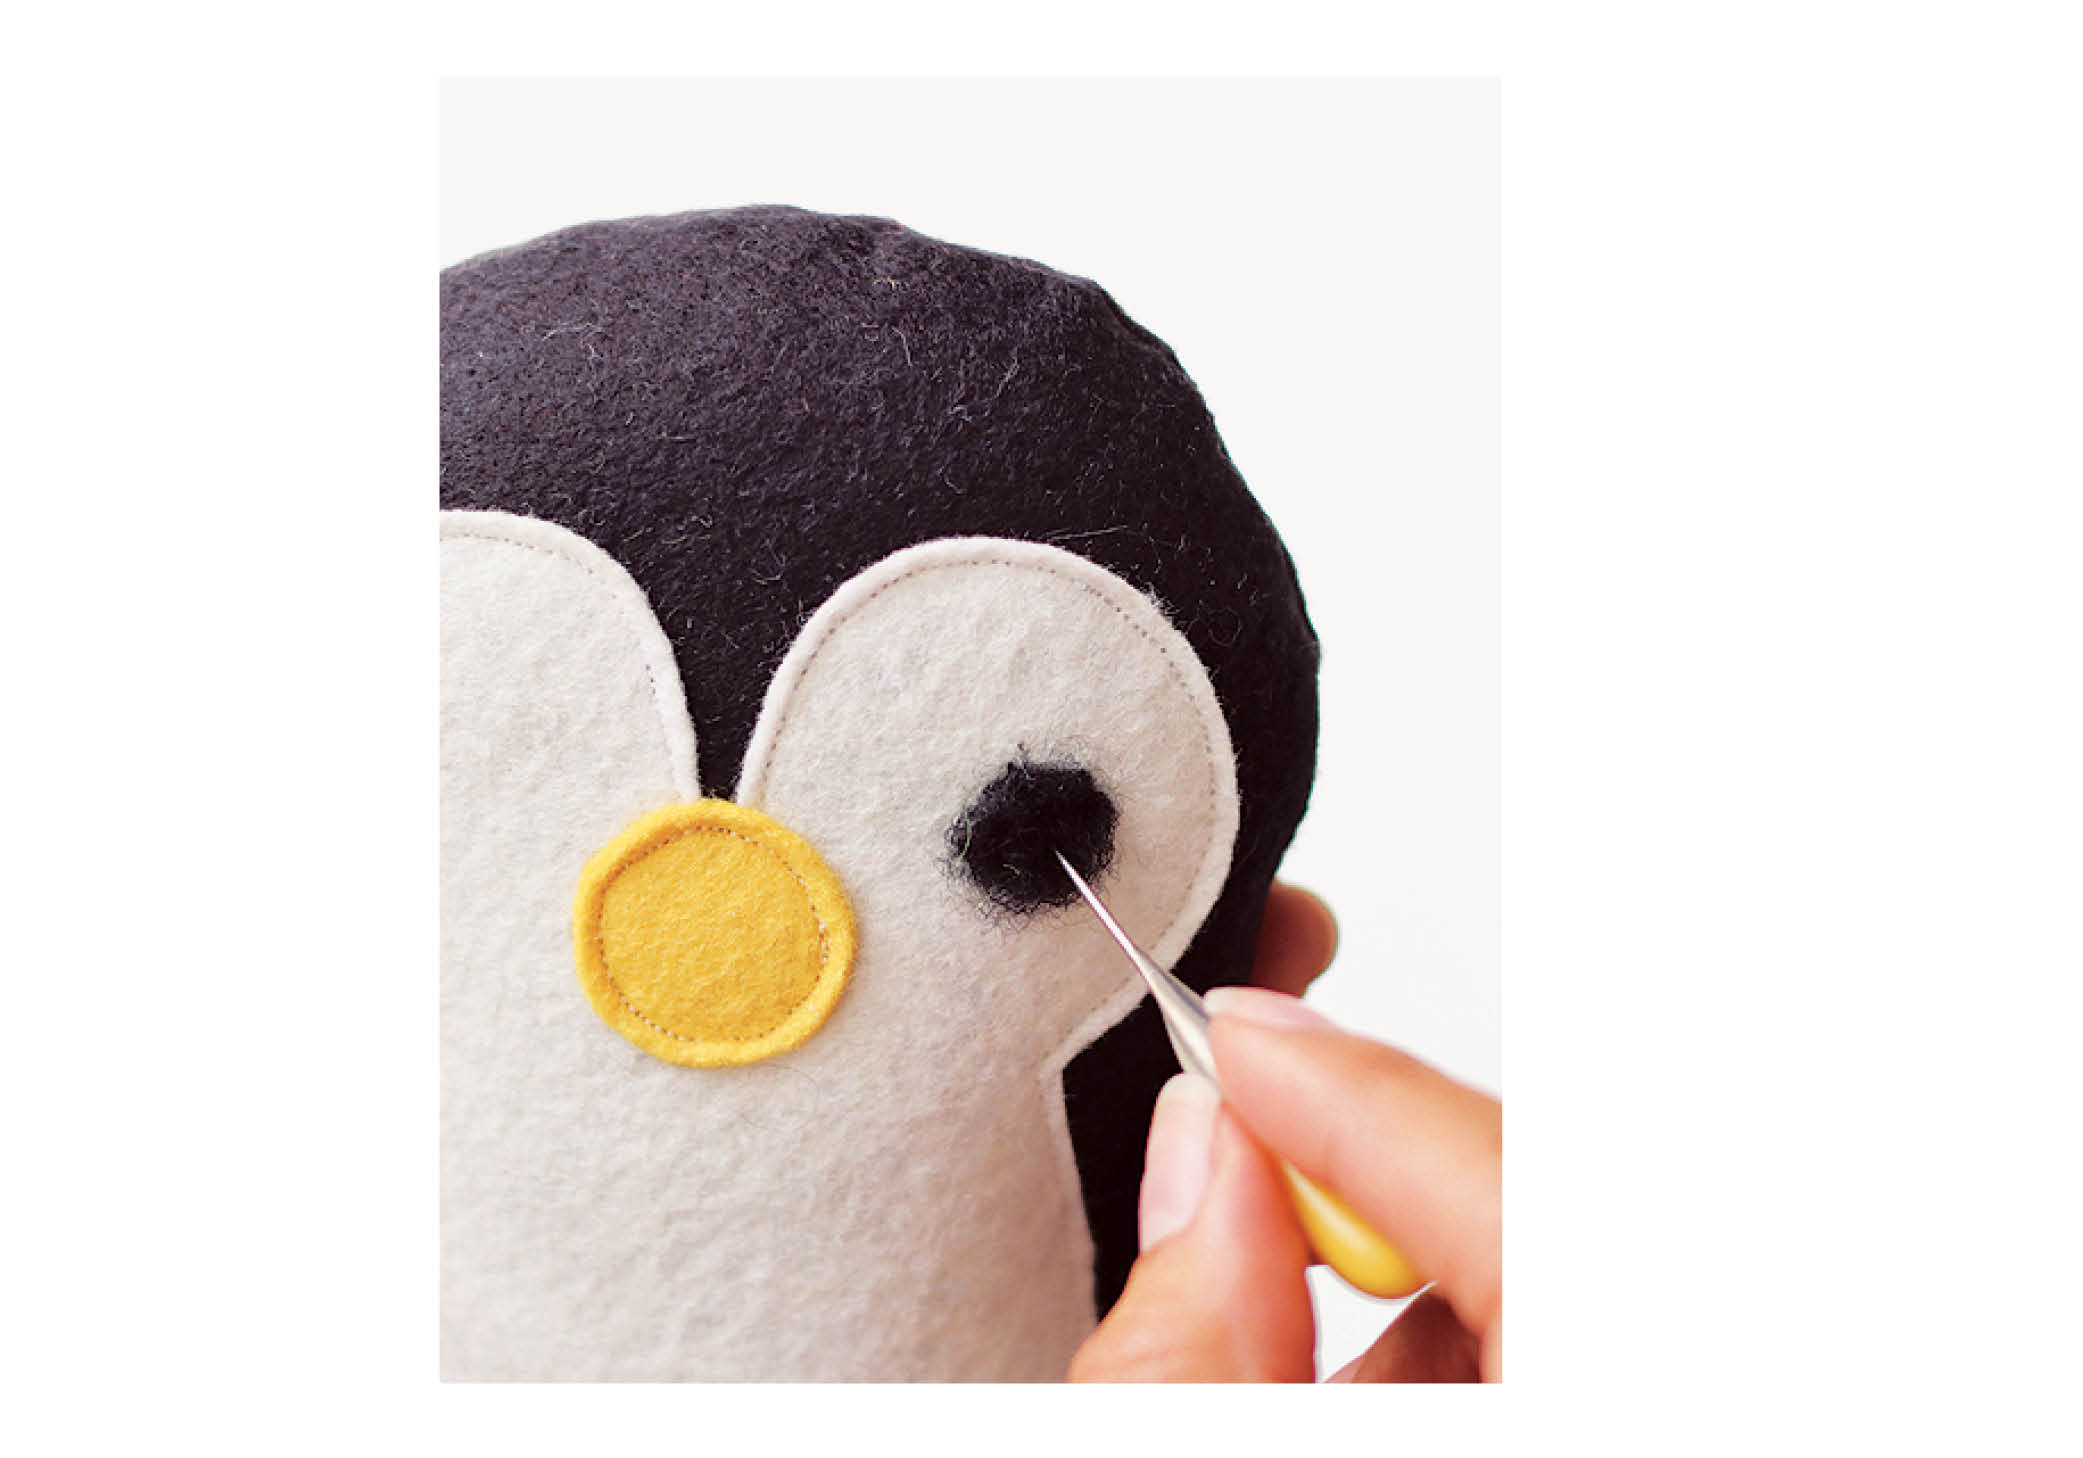
Needle Felting the Details
- Using the black wool roving, felt the eyes in place with the felting needle.
- Take the white wool roving and felt the pupils in place.
- If you’re needle felting the beak, take the yellow wool roving and roll it in a ball.
- Place it on the middle of the face, and start felting at the base to attach it.
- When you’ve secured the beak all around the base, start shaping it. Felt the tip more to make a cone shape.
Adding a scarf
- This is a great easy accessory to make out of recycled material. For this scarf, the author repurposed an old sweater, but you could also use a scarf or wool sock.
- With wrong sides together, fold the knit fabric in half and sew using a zigzag stitch along the short edge.
- Turn right-side out, and dress up your penguin.
Polar Bear Ornaments
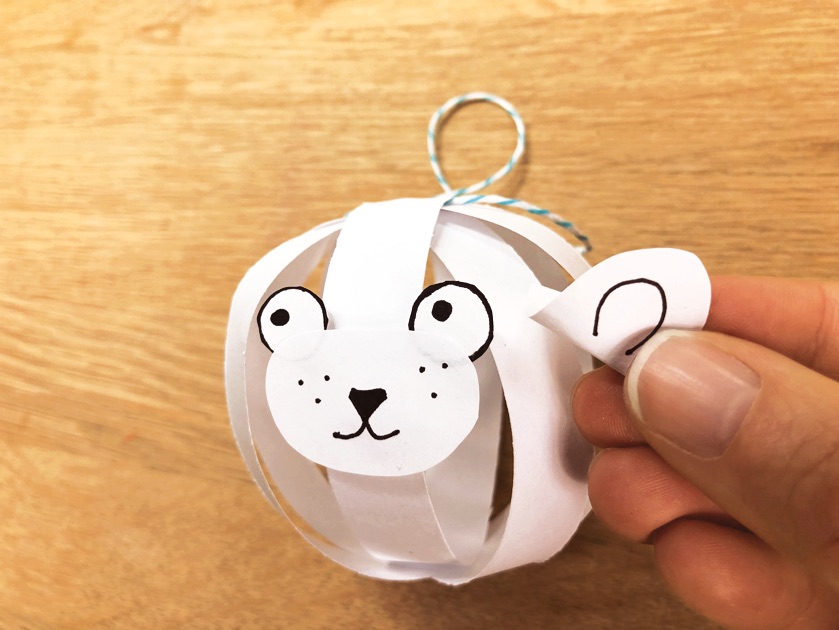
Best for ages: 4-11
Working with paper is easy for any age – even preschoolers who love to practice their scissors skills – as Maggy Woodley describes in Easy Paper Projects. The book is full of 60 projects that kids can make using paper to create gifts to wear, give away or use every day. These ornaments are adorable to light up any holiday tree or winter scene.
Materials
- Printer paper
- Baker’s twine or ribbon (for hanging)
- Scraps of blue paper (optional)
- Tools
- Ruler
- Scissors
- Glue stick
- Pen
Directions
- If you cut carefully, you can get eight strips of paper from one sheet of paper to make two polar bears. You need four strips of paper per bear. Fold each strip in half lengthwise and gently crease to mark the center of each strip.
- Lay one strip over a second strip to make a cross and use a glue stick to glue in place. Repeat with the remaining strips, gluing them in place at diagonals to one another.
- Bring the two ends together and glue, create a circular loop. Add a little glue to the top of the loop and bring up the end of each remaining strip to the center (adding glue as necessary to secure) until there is only one unglued end left.
- Take a little baker’s twine or ribbon, knot and place on top of your ornament. Glue the remaining strip in place over it to secure it for hanging. Your basic paper-strip ornament is finished!
To Decorate
- You can choose to add a splash of color or leave your polar bear white. Cut out ears, a mouth and eyes, decorating with a pen where necessary. Make a small fold at the bottom of each ear and glue into place. Finally, glue on the mouth and eyes.
What else can you turn this basic paper ornament into? A snowman’s head? A chubby little round bird?
Candy Cane Heart Pops

Best for ages: 3-8
One of the best ways to introduce foods to kids is to let them in on the cooking. In The Ultimate Kids’ Baking Book by Tiffany Dahle, kids of all ages can quickly turn that fun into presents. From cakes and cookies to pies and brownies, pint-sized bakers can make goodies beautiful enough to give as presents to neighbors, family and friends. These pops make good use of that most ubiquitous of holiday substances: the candy cane.
Materials
- 12 lollipop or cake pop sticks
- 24 mini candy canes
- 1 (12-oz) package of candy melts
- Sprinkles (optional)
Directions
- Lay a large piece of waxed or parchment paper on your counter. Set out the lollipop or cake pop sticks.
- Pair up two mini candy canes to form each heart. Place a lollipop stick inside the bottom of each heart with the tips of the candy canes touching the stick.
- In a microwave-safe bowl, add the candy melts. Heat on HIGH for 30 seconds. Wear oven mitts to remove the bowl for stirring. Heat in 15-second sessions as needed to get the candy to completely melt and stir smoothly. Really stir a lot each time; it will help the candy become smooth with the least amount of heat.
- Carefully spoon the melted candy into each heart. Start with just a little and add more if you need to fill it. You might want to use a toothpick or the tip of your spoon to help push the candy filling all around inside the heart.
- Give the candy filling one minute to begin to set and then add your sprinkles, if using, while still wet.
- Let the hearts completely cool and then gently peel them away from the paper to serve.
Follow Chicago Parent on Instagram.
from Metro Parent https://ift.tt/Atm59XK


0 comments:
Post a Comment